Set Up Client Portal Access in Xero
Set Up Client Portal Access in Xero
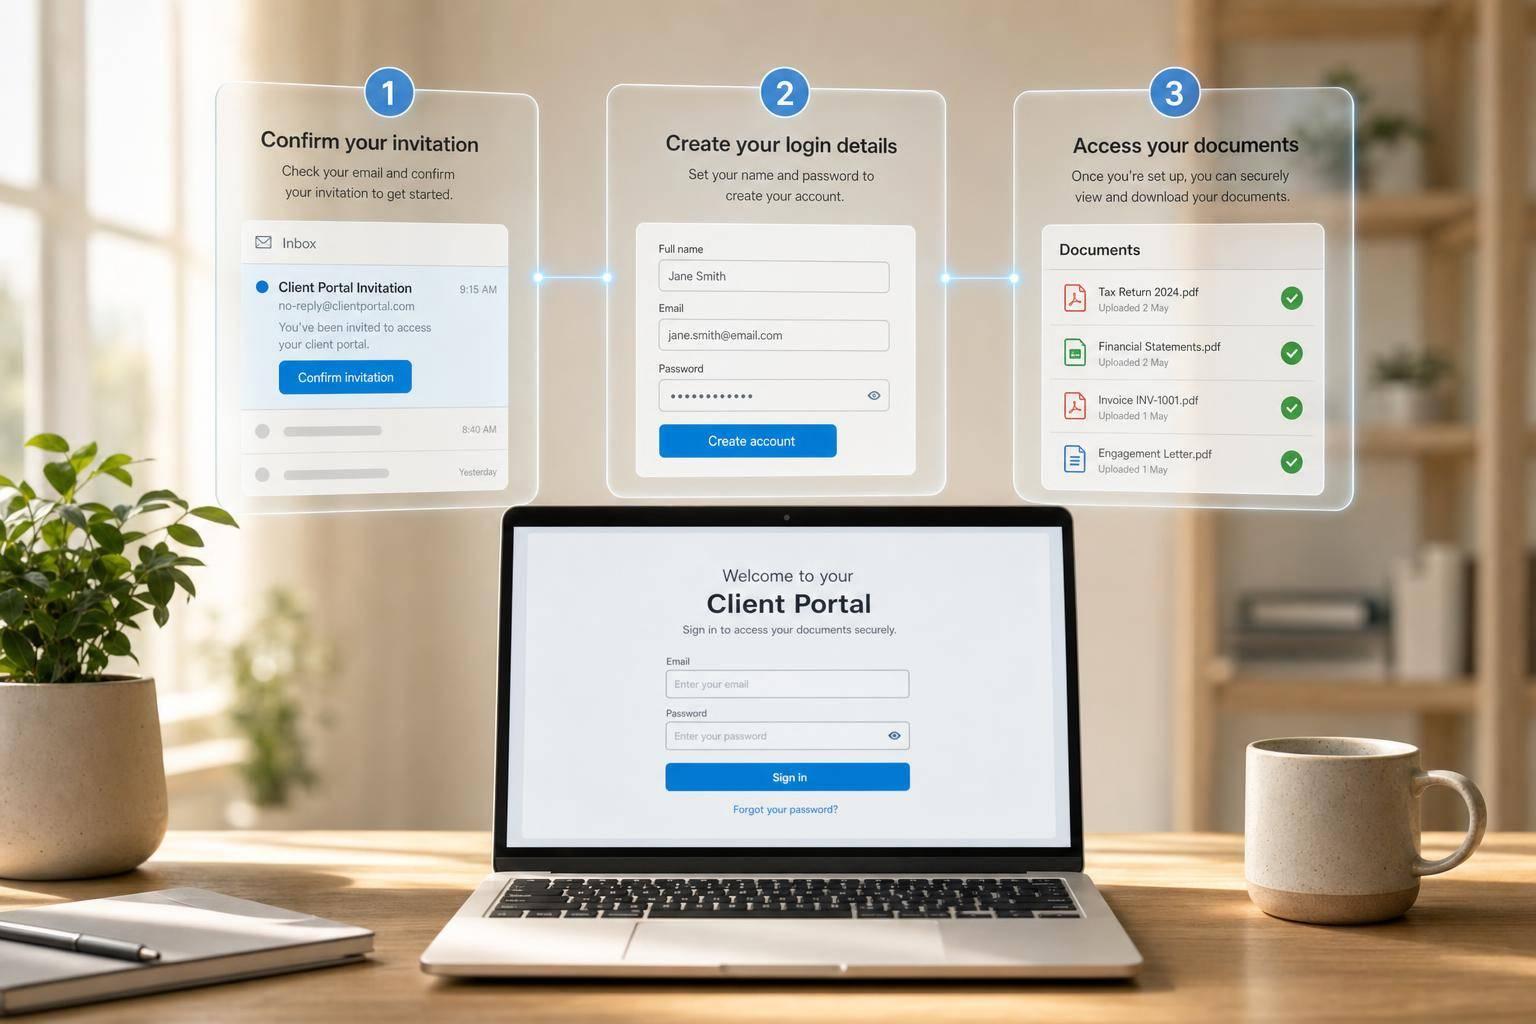
You can usually set up Xero client portal access in a few minutes. In most cases, I just need to open the invite in the same email inbox, click the link, confirm my email, create a password, and sign in.
Here’s the short version:
- Use the exact email address that got the invite
- Do not forward the email to another account
- Click Review documents
- Open the follow-up email and confirm with “Yes, it’s me – let’s get started”
- Enter my name, password, phone number, country, and time zone
- Sign in and check for documents or action requests
A couple of points cause most access problems:
- the invite went to the wrong inbox
- the setup was not finished
- the link was opened from a different email account
- the browser blocked the page
Xero says setup often takes only a few minutes. If I can’t get in, the first thing to check is the email address used for the invite.
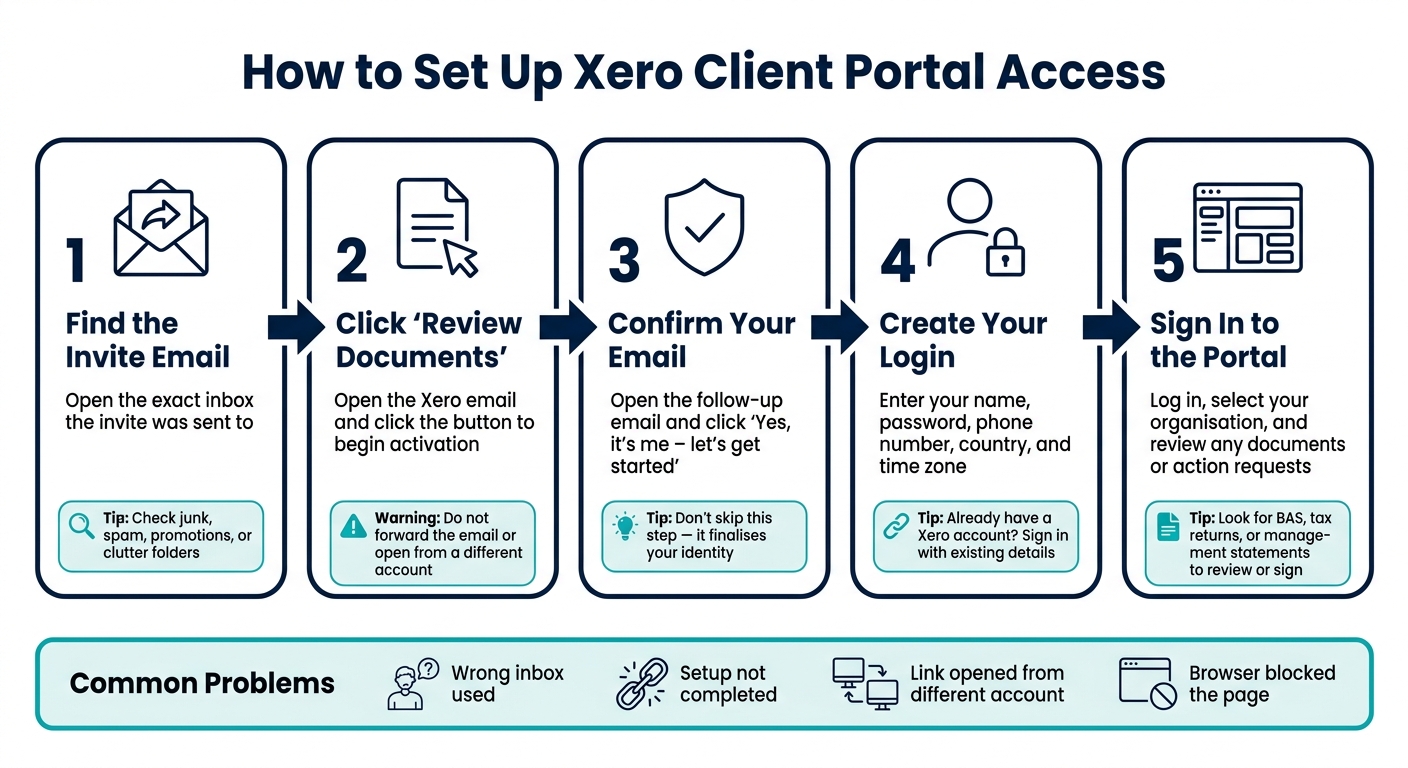
| Step | What I do | What to watch for |
|---|---|---|
| Find invite | Open the invited inbox and find the Xero email | Check junk, spam, promotions, or clutter |
| Start setup | Click Review documents | Use the same inbox the invite was sent to |
| Confirm email | Open the follow-up email and confirm it’s me | Don’t skip this step |
| Create login | Add my name, password, phone, country, and time zone | If I already have a Xero login, I sign in with that |
| First sign-in | Log in and open the portal | Check for files to review or sign |
If I follow those steps in order, setup is usually straightforward. The rest of the guide just walks through each step and the common fixes if something goes wrong.
How to Set Up Xero Client Portal Access: 5-Step Guide
What You Need Before You Start
Before you begin, make sure you can access the invited inbox and have your login details ready.
Check Which Email Address Was Invited
The portal invitation is sent to the exact email address entered during setup. The activation link only works if you open it from that same inbox. If you’re not sure which address was used, check with the person who sent the invite before you go any further.
Don’t forward the invite or open it from a different email account. The activation link is tied to the original recipient’s address, so either of those can lead to a sign-in error or a failed activation.
If the invite isn’t in your inbox, check your junk or spam folder. If you find it there, open it and continue.
Get Your Login Details Ready
During activation, you’ll be asked to enter your first name, last name, and a new password. When you first sign in, you’ll also need to confirm your country and time zone.
It’s also a good idea to keep your mobile nearby, just in case the portal asks for phone verification.
Once you’ve confirmed the right inbox and have your details ready, open the invite email and click the link.
sbb-itb-98a37a2
Find the Invite Email and Start Activation
Find the Xero Invitation Email

Open the inbox where the invite was sent. Look for an email from Xero that mentions your bookkeeping or tax firm. In some cases, it will also show the name of the person who sent it.
If you don't see it in your main inbox, check your promotions or clutter folders first. It can also help to search for "Xero" or "Review documents" in your email client so you can spot it faster.
Click the Portal Link in the Email
After you find the email, look for the button in the message, usually labelled Review documents. Click it to begin the activation process.
Xero will then send a second verification email to that same address. Open it and click Yes, it's me - let's get started.
If that email address already has a Xero login linked to it, sign in with those details instead of setting up a new account.
Then create your password and confirm your account details.
Create Your Xero Login
Set a Password and Enter Your Account Details
On the account creation screen, enter your first name, last name, and email address. Then tick the "I'm not a robot" CAPTCHA and agree to Xero's terms of use and privacy notice before you continue. Xero will then send a confirmation email. Open that email and click "Yes, it's me - let's get started" to get to the final screen.
On the final screen, enter a password, add your phone number, and choose Australia so the account lines up with the organisation settings.
Open the confirmation email to complete activation.
Confirm Your Activation Details
After you've filled in all the fields, click "Activate your account" to finish setting things up. Keep the tab open until the activation process is done.
You can then use those details to sign in for the first time.
Sign In to the Portal for the First Time
Complete Your First Sign-In
Sign in with the email address and password you just set up. Once you're in, choose your organisation name from the top-left corner.
After that, take a moment to see whether there are any documents waiting for you.
Check Documents and Requested Actions
When you enter the portal, look for anything that has been sent to you for review or approval. Your bookkeeper or tax agent might have shared documents like a BAS, a tax return, or monthly management statements.
The portal gives you one secure place to view, download, and sign documents. If something needs your approval, open Review documents and take action there. In most cases, you can sign documents in just a few clicks.
If you can't see anything, contact your bookkeeper or tax agent to check whether documents have been sent.
Fix Common Portal Access Problems
Most portal access issues come down to two things: a missing invite or an activation that didn’t finish properly. If the invite won’t open, or setup stops halfway, run through the checks below.
Invite Email Not Received or Link Not Working
Start by searching your inbox for "Xero". If it’s not there, check your junk or spam folders too. Still nothing? Confirm the invited email address with your adviser and ask them to resend the invite.
If the link is there but won’t load, try opening it in a different current browser and clear your cache.
Wrong Email Address or Incomplete Activation
If the link opens but sign-in fails, first check that you’re using the same email address that received the invite.
Another common problem is an activation that wasn’t finished. Access is only finalised after you click the invite, create your login details, and complete activation. If you’re not sure whether you got all the way through, go back to the original invitation email and start again.
If none of that works, contact your adviser and ask them to send a fresh invitation.
FAQs
What if I used the wrong email?
If you used the wrong email, you can fix it in your account settings. Open your profile, then select Change next to your email address.
If an invitation went to the wrong email, decline or cancel that invite first. Then send a new one to the correct address from the Users section.
If that email is already linked to another user, you may need to reset the password or send the invitation again.
Can I use my existing Xero login?
Yes. You can use your existing Xero login to set up client portal access.
If you’re invited, or you’re giving your accountant access, you’ll usually sign in with your current Xero details to accept the invite or open the portal. That means existing Xero users can get access without setting up a separate login.
Why isn’t the portal link working?
The portal link may fail for a couple of common reasons: a tech glitch or a missed step during sign-in. First, check the basics. Make sure you received the invite email, the link is correct, and it hasn’t expired. Then confirm you’re entering the right email address and password.
If the link still won’t open, try a few simple fixes:
- Clear your browser cache
- Use a different browser
- Check if there’s a service outage
- Confirm your account has the right permissions
Sometimes it’s something small, like an old saved session or the wrong login details. Other times, access hasn’t been turned on for your account yet.